Introduction
In this brief guide, you’ll see just how easy it is to be a beeping pro! 😎
After doing it a couple of times, we guarantee the process will become second nature & you’ll see your workflow speed skyrocket!
Table of Contents
- Introduction
- Requirements to Beep
- 1. Creating a Beep
- 2. Commenting in Beep
- 3. Saving/Sharing a Beep
- 4. Receiving a Beep
Requirements to Beep
Beeping can only begin once you have ensured you have the following:
- Functioning mouse/mousepad & keyboard
- Internet Access
- You have installed Beep on your browser & completed the sign-up process
- On the browser, you are logged-in to the user account you used to install Beep
1. Creating a Beep

- Navigate to the website you want to comment on.
- Hold down both “Alt (Windows) / Option (Mac)” & “C” on your keyboard.
- Once you see your mouse cursor change to a purple circle with a white plus-sign in the center, you can stop pressing the keys.
- On the website, left-click where exactly you want to drop the beep. You should see a comment box appear.
- If you want to cancel making the current Beep, simply click the “x” button on the top-right corner of the comment box.
2. Commenting in Beep
- In the comment box (step 1.4), type your comment.
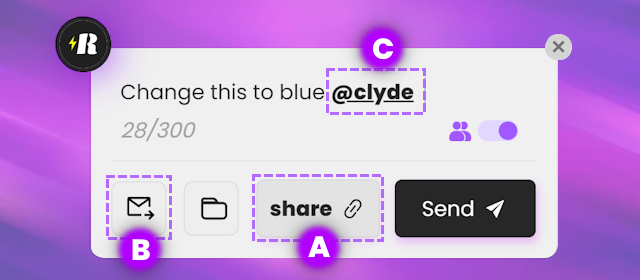
- You may notice that there is a 300 character limit. This is because Beeps are made to be concise and easy to read. Rephrase your text to something shorter if you surpass this limit.
3. Saving/Sharing a Beep
3A. Saving a Beep
- Double-check the comment you typed (since, at the moment, there is no way to edit beeps after they’ve been created).
- Left-click on the black “Save” button located in the lower-right corner of the comment box.
- You will see the comment box disappear and your avatar spinning. The word, “creating…”, will appear beside your avatar.
- When the avatar stops spinning and the words “added” appear - you have successfully saved the beep!
3B. Sharing a Beep
- Double-check the comment you typed (since, at the moment, there is no way to edit beeps after they’ve been created).
- There are 3 main ways to share a beep with someone (as shown in the image above):
- Sharing a Link
- Left-click the “share/link icon” button. A link will be automatically copied to your clipboard & the comment box will close.
- Head over to a messaging tool of your choice
- Paste the link in the chat box
- Send it out to the person.
- Email
- Left-click the button with a mail icon.
- On the window that appears, type your recipient’s email in the text bar and then click “+”. If successful, you should see their email address appear above the text bar.
- If you want to add more recipients, just repeat the previous step.
- If you want to remove recipients you added, just click on the “x” beside them.
- Once you’re done, click on “save”. This will close that window.
- Once back to the original Beep comment box, click on the “Save” button.
- Tagging a User
- Doing this requires the recipient to be a registered Beep user. If not, you can invite them.
- In the comment box, type “@” followed by the username of your recipient.
- After typing in their username, press space. You should see the “Save” button on the lower-right corner change to “Send”
- Click “Send”
- Assigning beeps via the dashboard (only for team mates)
- To do this, click “Send”, continue to steps 3 & 4 of this list, and then follow the steps to assign beeps to team mates on this article.
- Sharing a Link
- You will see the comment box disappear and your avatar spinning. The word, “creating…”, will appear beside your avatar.
- When the avatar stops spinning and the words “added” appear - you have successfully saved the beep!
4. Receiving a Beep

- When someone sends you a beep, you will receive a notification on the upper-right corner of your browser.
- The notification provides you 2 options:
- Clicking on “open” will take you to the screenshot share page (continue to step 3).
- Clicking on “go to url” will take you to the webpage where that beep was created (skip to step 4).
- On the screenshot share page:
- You will see the screenshot of the webpage on the left side with the sender’s avatar marking where on the page they dropped the beep.
- Hovering over the sender’s marker will reveal their comment.
- To reply to their beep:
- Click on “0 reply” on the right panel.
- Type your reply in the comment box that appears.
- Click the paper airplane button to send.
- To visit the webpage where the sender left the beep, click on the link displayed on the right panel.
- Once you are taken to the webpage, maximize the Beep toolbar and click the “locate” button to see the exact position the beep was left on the page.